Table of Contents
ToggleDIY projects strategies can make the difference between a successful build and a frustrating mess. Every year, millions of homeowners tackle projects ranging from simple shelf installations to full room renovations. The key to success lies in proper planning, smart budgeting, and realistic time management.
This guide breaks down the essential DIY projects strategies that experienced builders use. Whether someone is building their first bookcase or remodeling a bathroom, these principles apply. The goal is simple: finish projects on time, on budget, and with results worth showing off.
Key Takeaways
- Effective DIY projects strategies start with clear, written goals that define exact outcomes and completion criteria.
- Budget using the “cost plus 20%” rule to cover unexpected expenses like hidden damage or material defects.
- Rent specialty tools for one-time use and invest in quality versions of frequently used equipment.
- Multiply your initial time estimate by 1.5 to 2 for realistic scheduling, especially for first-time projects.
- Break large projects into phases with logical stopping points to prevent burnout and maintain quality.
- Never rush finishing work—the final 10% of a project often takes 50% of the time but determines overall quality.
Setting Clear Goals Before You Start
Every successful DIY project begins with a clear vision. Vague ideas like “fix up the basement” lead to scope creep, wasted materials, and unfinished work. Smart DIY projects strategies start with specific, measurable goals.
Builders should ask themselves three questions before picking up a single tool:
- What is the exact end result? Write it down. “Install a 6-foot workbench with pegboard storage” beats “organize the garage” every time.
- Why does this project matter? Understanding the purpose helps prioritize features and cut unnecessary steps.
- What does success look like? Define completion criteria so there’s no confusion about when the job is done.
Skipping this step is tempting. Most people want to jump straight into building. But spending 30 minutes on goal-setting can save hours of rework later.
For complex projects, breaking the work into phases helps maintain focus. A kitchen renovation might include demolition, electrical, plumbing, cabinetry, and finishing as separate stages. Each phase gets its own mini-goal and completion checkpoint.
Writing goals down matters more than people think. Studies show written goals increase follow-through by nearly 40%. A sticky note on the workbench keeps priorities visible throughout the build.
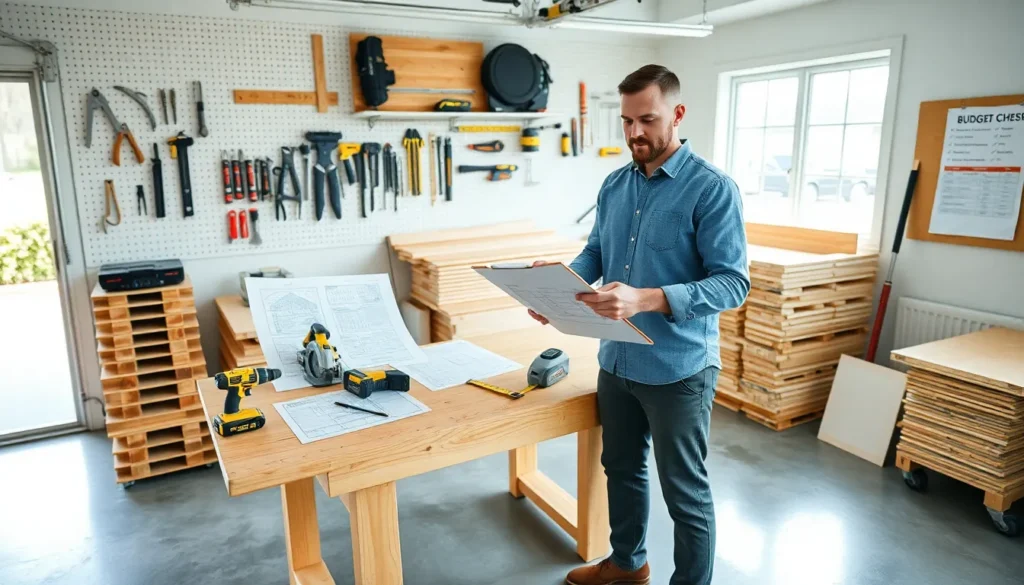
Budgeting and Material Planning
Money runs out faster than most DIYers expect. Effective DIY projects strategies include detailed budgets with built-in buffers for surprises.
Start by listing every material the project requires. Don’t forget the small stuff, screws, sandpaper, wood glue, and finishing supplies add up quickly. A common mistake is budgeting only for the big-ticket items while ignoring consumables.
Creating a Realistic Budget
Experienced builders follow the “cost plus 20%” rule. Calculate the expected total, then add 20% for unexpected expenses. Hidden rot, wrong measurements, and material defects happen on nearly every project.
Price comparison saves real money. The same 2×4 can vary by 30% between stores. Online retailers, local lumberyards, and big-box stores all have different pricing structures. Spending an hour researching prices can save $100 or more on medium-sized projects.
Smart Material Purchasing
Buying materials in the right quantities requires careful math. Order about 10% extra lumber to account for warped boards and cutting mistakes. For tile and flooring, 15% overage is standard.
Timing purchases matters too. Many hardware stores run sales around major holidays. Buying materials during these windows can cut costs significantly. Some builders plan their DIY projects strategies around these sales cycles.
Choosing the Right Tools for the Job
The right tools make projects easier and results better. Wrong tools lead to frustration, poor quality, and sometimes injury. Strong DIY projects strategies include honest assessments of tool needs before starting work.
Not every project requires buying new equipment. Tool rental makes sense for specialty items used once or twice. A tile saw for a bathroom floor costs $50 to rent versus $300 to buy. The math is simple.
For tools that see regular use, quality matters. A cheap drill might work for hanging pictures but will struggle with deck screws. Buy the best quality affordable for frequently used tools. Save money by renting or buying budget versions of rarely needed equipment.
Essential Tools for Most Projects
Certain tools appear in almost every DIY project:
- A quality cordless drill with multiple bit sets
- A circular saw for straight cuts
- A level (both torpedo and 4-foot versions)
- Measuring tape and speed square
- Safety glasses and hearing protection
These basics handle 80% of common home projects. Building a solid foundation of essential tools supports better DIY projects strategies over time.
Maintaining tools extends their life and improves results. Sharp saw blades cut cleaner. Charged batteries prevent mid-project delays. A few minutes of maintenance before each project prevents problems during the build.
Time Management and Project Scheduling
Time estimates for DIY work are almost always wrong, usually by a lot. Professionals often multiply their initial estimate by 1.5 or even 2 for accurate scheduling. Amateur builders should add even more buffer.
Realistic DIY projects strategies account for learning curves. A first-time tile installation takes three times longer than an experienced installer’s pace. That’s normal, not a problem. Rushing leads to mistakes that take even longer to fix.
Breaking Projects Into Sessions
Few people have unlimited time blocks for projects. Most DIY work happens in evenings and weekends between other responsibilities. Planning for this reality improves outcomes.
Identify logical stopping points before starting. Some tasks can’t be interrupted, poured concrete needs finishing before it sets. Others pause easily. Knowing the difference prevents being stuck at midnight with no good stopping point.
Schedule the messiest work first when energy is high. Demolition, sanding, and painting prep are exhausting. Saving them for the end of a long day leads to shortcuts and poor results.
Avoiding Project Burnout
Multi-week projects test patience. Effective DIY projects strategies include planned breaks and milestone celebrations. Finishing a difficult phase deserves recognition before starting the next one.
Some builders photograph progress regularly. Looking back at how far a project has come provides motivation when the remaining work feels endless.
Troubleshooting Common DIY Challenges
Every project hits snags. Experienced builders expect problems and plan responses in advance. Good DIY projects strategies include troubleshooting skills alongside construction skills.
Measurement Mistakes
The carpenter’s saying exists for a reason: measure twice, cut once. Yet measurement errors remain the most common DIY problem. Double-checking critical measurements catches mistakes before they become expensive.
When cuts do go wrong, assess whether the piece is salvageable. Sometimes a board cut too short works in a less visible location. Flexibility with materials reduces waste and frustration.
Unexpected Structural Issues
Opening walls reveals surprises. Pipes, wires, and previous repair work appear where plans said nothing existed. Smart DIY projects strategies include contingency time for discovery and adaptation.
Knowing personal limits prevents disasters. Electrical and plumbing work in many areas requires permits and inspections. Moving a load-bearing wall needs professional engineering input. Recognizing when to call an expert is itself a valuable skill.
Finish Quality Problems
The final 10% of a project takes 50% of the time. Rushing through finishing work ruins otherwise solid builds. Paint drips, uneven caulk lines, and visible screw holes undermine hours of careful construction.
Patience with finishing separates good DIY work from great results. Taking extra time on details pays dividends every time someone sees the completed project.


